L3VPN on Linux
Today we are going to dive into MPLS service known as L3VPN. If you don’t familiar with either MPLS or L3VPN I highly recommend you this two books: “MPLS fundamentals” [1] and “MPLS in SDN era” [2]. But for this post I assume you have at least basic understanding of both technologies. They are not new things and chances pretty high that network engineers will meet them early in they career, so why another post? Can we just go and read CCIE exam guide? The difference is that we are going to see L3VPN works on Linux hosts/nodes. Mostly for MPLS and VRF parts, but having that two, why not build an L3VPN, huh? We are going to implement number of labs, getting different building blocks work on they own and then combine them into final service.
Builders
Speaking of building blocks. What we gonna need for such a task? Multiple things.
MPLS
To do packet encapsulation and standard MPLS forwarding actions such as push, pop and swap. For this reason we need to load additional kernel modules [3] and tweak some system settings. Seems like foundation was built in kernel since 4.1 [4] and full blown support arrived in version 4.3 [5]. As of now, probably all contemporary distros support MPLS. To work with labels and encapsulation you need iproute2, same thing you use for both IP versions.
FRR
Encapsulation and pushing labels are cool, but doing it manually is not. So we need LDP and some IGP to build on top of it. As far as I know, as of now, there is only one choice – FRR (free range routing) [6]. FRR started as a fork of Quagga routing suite, which still developing, but failed to provide new features. That’s why FRR forked in 2017 and quickly bring many new routing functionality into Linux. LDP, for example, was added with it’s first release! Cumulus Linux use FRR as it’s routing stack by default. That post isn’t introduction to FRR, so if you not familiar with it you may want to learn basics. In that case documentation [7] is probably best place to start with. Anyway, we are going to build lab with FRR running IS-IS+LDP, so you won’t get lost.
VRF
VRF support was quite complicated until engineers from Cumulus Networks get into it. Read great article in they blog to understand how it was before and especially how it’s working nowadays [8]. Since kernel version 4.8 full blown VRF support created by them is incorporated into kernel [9].
Having all that parts gathered we can conclude that starting from April 2017 there is full support of L3VPN in Linux. Let’s see it working, shall we?
Lab #1 where static LSPs build
We will start with a simple lab with 3 nodes connected in a row (R1 — R2 — R3). R1 and R3 will build static LSPs between they loopbacks. We aimed to ping R3 loopback from R1 loopback and see labeled packets going through R2 interfaces. Vagrantfile would be quite short:
Vagrant.configure("2") do |config|
  config.vm.define "r1" do |r1|
      r1.vm.box = "debian/stretch64"
      r1.vm.hostname = "R1"
      r1.vm.network "private_network", ip: "192.168.12.1", virtualbox_intnet: "nix12"
  end
  config.vm.define "r2" do |r2|
      r2.vm.box = "debian/stretch64"
      r2.vm.hostname = "R2"
      r2.vm.network "private_network", ip: "192.168.12.2", virtualbox_intnet: "nix12"
      r2.vm.network "private_network", ip: "192.168.23.2", virtualbox_intnet: "nix23"
  end
  config.vm.define "r3" do |r3|
      r3.vm.box = "debian/stretch64"
      r3.vm.hostname = "R3"
      r3.vm.network "private_network", ip: "192.168.23.3", virtualbox_intnet: "nix23"
  end
end
Create project directory, put above config into Vagrantfile as usual and start lab with vagrant up. After all boxes booted, let’s configure our routers, starting from R1. Not so much stuff we are going to do here. First of all let’s add loopback address, like:
sudo ip addr add 172.20.15.1/32 dev lo
To build static LSP to R3 loopback we just need one command here:
sudo ip route add 172.20.15.3/32 encap mpls 100 via inet 192.168.12.2
This command will instruct kernel to encapsulate traffic to R3 loopback into one MPLS label (100) and send it towards R2 interface. Pretty straightforward and quite simple. You don’t even need to mess with MPLS address family. To see that route just use ip route command as always.
vagrant@R1:~$ ip route show
default via 10.0.2.2 dev eth0
10.0.2.0/24 dev eth0 proto kernel scope link src 10.0.2.15
172.20.15.3  encap mpls  100 via 192.168.12.2 dev eth1
192.168.12.0/24 dev eth1 proto kernel scope link src 192.168.12.1
You don’t even need to load any kernel modules to do this. Next, do identical things on R3:
sudo ip addr add 172.20.15.3/32 dev lo
sudo ip route add 172.20.15.1/32 encap mpls 200 via inet 192.168.23.2
As you may imagine, main work must be done on our R2 node. To do basic MPLS operations, such as push/pop/swap we need that kernel module:
sudo modprobe mpls_router
Next we must allow MPLS operations on interfaces and allocate label space:
sudo sysctl net.mpls.conf.eth1.input=1
sudo sysctl net.mpls.conf.eth2.input=1
sudo sysctl net.mpls.platform_labels=10000
Ten thousands is just arbitrary number here that will just work. I found that 30 for example will not work for some labels (even ones below 30), don’t know why but was to lazy to search for an answer. And now we need to declare MPLS routes:
sudo ip -M route add 100 via inet 192.168.23.3
sudo ip -M route add 200 via inet 192.168.12.1
That routes will pop a label and forward packet towards next hop router. Nothing complex here. If now we ping R3 loopback from R1 loopback we can see such packets on eth1 of R2:
06:21:44.909382 08:00:27:fb:b6:5f > 08:00:27:4d:10:8b, ethertype MPLS unicast (0x8847), length 102: MPLS (label 100, exp 0, [S], ttl 64)
    (tos 0x0, ttl 64, id 34740, offset 0, flags [DF], proto ICMP (1), length 84)
    172.20.15.1 > 172.20.15.3: ICMP echo request, id 1368, seq 1, length 64
06:21:44.909880 08:00:27:4d:10:8b > 08:00:27:fb:b6:5f, ethertype IPv4 (0x0800), length 98: (tos 0x0, ttl 63, id 20296, offset 0, flags [none], proto ICMP (1), length 84)
    172.20.15.3 > 172.20.15.1: ICMP echo reply, id 1368, seq 1, length 64
Packets from R1 encapsulated into MPLS with one label (100), but replies from R3 is plain IP, because R2 already poped a label. You can see opposite on eth2 interface. So, as you can guess, -M in ip route command deal with MPLS address family. Of course you can do swap with something like:
sudo ip -M route add 410 as 800 via inet 192.168.23.5
And even swap/push operations:
sudo ip -M route add 300 as 1200/500 via inet 192.168.23.10
Nice, seems like MPLS with static LSPs works pretty well. On GitHub [10] you can find updated Vagrantfile with provisioning to start preconfigured lab (and all other files for this post). Having that done, let’s move forward.
Lab #2 where LSPs goes dynamic
Now we need to add some dynamics to our topology and get LDP to do all LSP heavy-lifting. To achieve that we also need some IGP to propagate routes here and there. Let’s use same 3 routers Vagrantfile, but add shell provisioning, like:
r1.vm.provision "shell", path: "frr_provisioning"
Remember to do it for every host. And then fill frr_provisioning file with:
#!/usr/bin/env bash

X=$(hostname)
sudo sysctl net.ipv4.ip_forward=1
sudo modprobe mpls_router
sudo modprobe mpls_iptunnel
sudo sysctl net.mpls.platform_labels=10000
sudo sysctl net.mpls.conf.eth1.input=1
if [[ "$X" = "R2" ]]; then
    sudo sysctl net.mpls.conf.eth2.input=1
fi
sudo ip addr add 172.20.15.${X: -1}/32 dev lo
wget https://github.com/FRRouting/frr/releases/download/frr-6.0/frr_6.0-1.debian9+1_amd64.deb
wget https://github.com/FRRouting/frr/releases/download/frr-6.0/frr-dbg_6.0-1.debian9+1_amd64.deb
wget https://github.com/FRRouting/frr/releases/download/frr-6.0/frr-pythontools_6.0-1.debian9+1_all.deb
sudo apt install -y libc-ares2 libjson-c3 python-ipaddr tcpdump vim
sudo dpkg -i frr_6.0-1.debian9+1_amd64.deb
sudo dpkg -i frr-dbg_6.0-1.debian9+1_amd64.deb
sudo dpkg -i frr-pythontools_6.0-1.debian9+1_all.deb
echo -e 'zebra=yes\nbgpd=yes\nldpd=yes' > frr-daemons
sudo mv frr-daemons /etc/frr/daemons
sudo systemctl start frr.service
What’s different here from what we already done? First, we enable IP forwarding, quite expected as we build routers. Second, we need one another module – mpls_iptunnel. I don’t really know what it does, answer probably lies exclusively in it’s code. But FRR needs it, so we enable it. After configuring loopback addresses, we fetch latest FRR version, install all of it dependencies (plus tcpdump and vim) and then install FRR itself. Next, we create file frr-daemons, which tell FRR what routing daemons to start (isisd, ldpd and zebra in our case). Finally we kick-start FRR. As there are empty configuration it will do pretty much nothing. But we are going to change it. To configure FRR we can use two methods, either alter frr.conf file and issue reload command (not restart) or connect to its VTY interface and go with conf t. Let’s try latter on R1. To kick-start connection do:
sudo vtysh
And now let’s configure IS-IS and LDP:
R1# conf t
R1(config)# interface eth1
R1(config-if)# ip router isis ISIS
R1(config-if)# isis circuit-type level-2-only
R1(config-if)# isis network point-to-point
R1(config-if)# interface lo
R1(config-if)# ip router isis ISIS
R1(config-if)# isis passive
R1(config-if)# exit
R1(config)# mpls ldp
R1(config-ldp)# router-id 172.20.15.1
R1(config-ldp)# address-family ipv4
R1(config-ldp-af)# discovery transport-address 172.20.15.1
R1(config-ldp-af)# interface eth1
R1(config-ldp-af-if)# exit
R1(config-ldp-af)# exit
R1(config-ldp)# exit
R1(config)# router isis ISIS
R1(config-router)# net 49.0001.1720.2001.5001.00
R1(config-router)# metric-style wide
R1(config-router)# end
R1# wr
Note: this version of vtysh never writes vtysh.conf
Building Configuration…
Warning: /etc/frr/frr.conf.sav unlink failed
Integrated configuration saved to /etc/frr/frr.conf
[OK]
R1#
That would be enough to meet our target. Config on R3 is pretty identical and for R2 we just need to add eth2 into party. As we already have frr.conf on R1 we can continue by copy-paste-alter that file or just use conf t. Your choice, I will skip configuration for two other boxes. But if you will use file method, don’t forget to do:
sudo systemctl reload frr.service
After we have all configuration in place let’s issue some verification commands on R2:
R2# show isis neighbor
Area ISIS:
  System Id           Interface   L  State        Holdtime SNPA
  R1                  eth1        2  Up           30       2020.2020.2020
  R3                  eth2        2  Up           29       2020.2020.2020
R2# show isis database
Area ISIS:
IS-IS Level-1 link-state database:
LSP ID                  PduLen  SeqNumber   Chksum  Holdtime  ATT/P/OL
R2.00-00             *     79   0x00000001  0x987b    1126    0/0/0
    1 LSPs
IS-IS Level-2 link-state database:
LSP ID                  PduLen  SeqNumber   Chksum  Holdtime  ATT/P/OL
R1.00-00                   84   0x00000002  0xdf0b    1172    0/0/0
R2.00-00             *     79   0x00000001  0x9a77    1155    0/0/0
R3.00-00                   84   0x00000002  0xf3e1    1155    0/0/0
    3 LSPs
R2# show mpls ldp neighbor
AF   ID              State       Remote Address    Uptime
ipv4 172.20.15.1     OPERATIONAL 172.20.15.1     00:00:07
ipv4 172.20.15.3     OPERATIONAL 172.20.15.3     00:00:06
R2# exit
vagrant@R2:~$ sudo vtysh -c 'show mpls ldp binding' | grep yes
ipv4 172.20.15.1/32       172.20.15.1     17          imp-null         yes
ipv4 172.20.15.3/32       172.20.15.3     16          imp-null         yes
vagrant@R2:~$ ip -M route show
16 via inet 192.168.23.3 dev eth2 proto 193
17 via inet 192.168.12.1 dev eth1 proto 193
Nice! We have IS-IS neighborship, LSDB built and LDP neighborship too. After that you can see that I exit VTY interface and issue next command from shell to have grep capability and filter out unused label bindings. Last command reveal MPLS routes installed in kernel by Zebra daemon. After that you can ping R3 loopback from R1 loopback and using tcpdump on R2 see labeled packets coming through our topology. Having that done, let’s move on.
Lab #3 where routes become separated
OK, time to test VRF capabilites of Linux. To do this we will use VRF-lite across some VLANs and some static routes. Topology will be a little larger, so here is a picture:
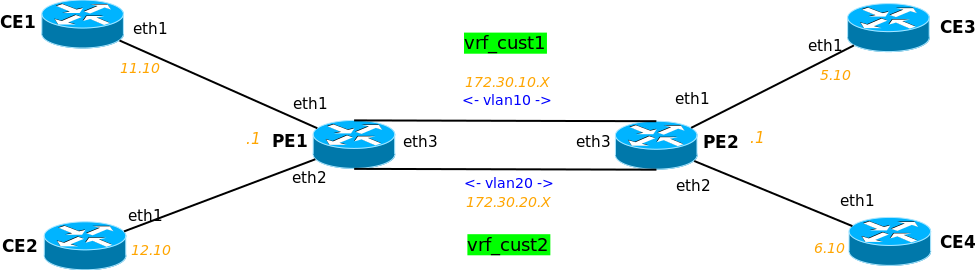
We will isolate CE1 with CE3 in one VRF (vrf_cust1) and CE2 with CE4 in another (vrf_cust2). Vagrantfile for this lab:
Vagrant.configure("2") do |config|
  config.vm.define "pe1" do |pe1|
      pe1.vm.box = "debian/stretch64"
      pe1.vm.hostname = "PE1"
      pe1.vm.network "private_network", ip: "192.168.11.1", virtualbox_intnet: "pe1ce1"
      pe1.vm.network "private_network", ip: "192.168.12.1", virtualbox_intnet: "pe1ce2"
      pe1.vm.network "private_network", ip: "192.168.66.1", virtualbox_intnet: "pe1pe2"
      pe1.vm.provision "shell", path: "vrf_lite_provisioning"
  end
  config.vm.define "pe2" do |pe2|
      pe2.vm.box = "debian/stretch64"
      pe2.vm.hostname = "PE2"
      pe2.vm.network "private_network", ip: "192.168.5.1", virtualbox_intnet: "pe2ce3"
      pe2.vm.network "private_network", ip: "192.168.6.1", virtualbox_intnet: "pe2ce4"
      pe2.vm.network "private_network", ip: "192.168.66.2", virtualbox_intnet: "pe1pe2"
      pe2.vm.provision "shell", path: "vrf_lite_provisioning"
  end
  config.vm.define "ce1" do |ce1|
      ce1.vm.box = "debian/stretch64"
      ce1.vm.hostname = "CE1"
      ce1.vm.network "private_network", ip: "192.168.11.10", virtualbox_intnet: "pe1ce1"
      ce1.vm.provision "shell", path: "vrf_lite_provisioning"
  end
  config.vm.define "ce2" do |ce2|
      ce2.vm.box = "debian/stretch64"
      ce2.vm.hostname = "CE2"
      ce2.vm.network "private_network", ip: "192.168.12.10", virtualbox_intnet: "pe1ce2"
      ce2.vm.provision "shell", path: "vrf_lite_provisioning"
  end
  config.vm.define "ce3" do |ce3|
      ce3.vm.box = "debian/stretch64"
      ce3.vm.hostname = "CE3"
      ce3.vm.network "private_network", ip: "192.168.5.10", virtualbox_intnet: "pe2ce3"
      ce3.vm.provision "shell", path: "vrf_lite_provisioning"
  end
  config.vm.define "ce4" do |ce4|
      ce4.vm.box = "debian/stretch64"
      ce4.vm.hostname = "CE4"
      ce4.vm.network "private_network", ip: "192.168.6.10", virtualbox_intnet: "pe2ce4"
      ce4.vm.provision "shell", path: "vrf_lite_provisioning"
  end
end
As you can guess most of the heavy-lifting will be done on PE routers. That time I will not configure nodes by hand, rather I will give you provisioning script which will do all the things. Nonetheless, we will go through it soon. Here it is:
#!/usr/bin/env bash

X=$(hostname)
if [[ "$X" =~ "PE" ]]; then
    self=${X: -1}
    route2=$((${X: -1}*6))
    route1=$(($route2-1))
    if [[ "$X" = PE1 ]]; then
        neighbor=2
    else
        neighbor=1
    fi
    sudo sysctl net.ipv4.ip_forward=1
    sudo ip addr add 172.20.5.$self/32 dev lo
    sudo ip addr del 192.168.66.$self/24 dev eth3
    sudo ip link add link eth3 name vlan10 type vlan id 10
    sudo ip link add link eth3 name vlan20 type vlan id 20
    sudo ip addr add 172.30.10.$self/24 dev vlan10
    sudo ip addr add 172.30.20.$self/24 dev vlan20
    sudo ip link set vlan10 up
    sudo ip link set vlan20 up
    sudo ip route add blackhole 0.0.0.0/0 table 10
    sudo ip route add blackhole 0.0.0.0/0 table 20
    sudo ip link add name vrf_cust1 type vrf table 10
    sudo ip link add name vrf_cust2 type vrf table 20
    sudo ip link set eth1 master vrf_cust1
    sudo ip link set vlan10 master vrf_cust1
    sudo ip link set eth2 master vrf_cust2
    sudo ip link set vlan20 master vrf_cust2
    sudo ip link set vrf_cust1 up
    sudo ip link set vrf_cust2 up
    sudo ip route add 192.168.$route1.0/24 via 172.30.10.$neighbor table 10
    sudo ip route add 192.168.$route2.0/24 via 172.30.20.$neighbor table 20
else
    case "$X" in
        CE1)
            ceroute=0
            router=11
            ;;
        CE2)
            ceroute=0
            router=12
            ;;
        CE3)
            ceroute=8
            router=5
            ;;
        CE4)
            ceroute=8
            router=6
            ;;
        *)
            echo "bad hostname"
            ;;
    esac
    sudo ip route add 192.168.$ceroute.0/21 via 192.168.$router.1
fi
sudo apt install -y tcpdump
First part deal with PE routers. After enabling IPv4 forwarding and assigning loopback address we delete address from PE-PE interface (eth3 on both sides). Then we create two VLAN interfaces on top of it (IDs 10 and 20):
sudo ip link add link eth3 name vlan10 type vlan id 10
In that command you can see link on top of which to create VLAN, name for new interface, interface type (vlan) and ID – pretty simple. After assigning both VLANs addresses and setting them up, we create routing tables. We must provide both VRFs with distinct routing tables. There are two ways to create new table. You can either edit /etc/iproute2/rt_tables file or add first route to a new table. Just for fun, I added default route pointing to blackhole (yep, that’s analogue of Cisco IOS’ null0 for example). Now we finally ready to create our VRFs, command is:
sudo ip link add name vrf_cust1 type vrf table 10
We just give it name, type (vrf) and table number. Routing tables can actually have a names too. Then, we assign different interfaces to VRF by declaring VRF interface it’s master. Don’t forget to set VRF interfaces up, add routes to the other side (PE-CE interface on another PE) and we are done on PEs. On CE routers we just need add correct route to other CE. And hey, why not install tcpdump on every box, huh? Having that in place we can spin up our topology (works great on i7 and 8 gigs of RAM, by the way) and see if it’s work. If you now SSH into CE1, you can ping CE3, but not CE2 or CE4. Similar things on other CEs. You can do tcpdumps on PEs and traceroutes on CEs to see how traffic going. Couple of useful VRF commands on PE:
ip link show type vrf
This one will show you all VRF interfaces in system.
ip link show vrf vrf_cust1
And this one will show you all interfaces bound to selected VRF. As you can see VRF work and not so difficult to set up. Let’s move on.
Lab #4 where L3VPN arise
In last lab we will tie all things up and run L3VPN. To make things more interesting let’s update our topology, adding a P router:
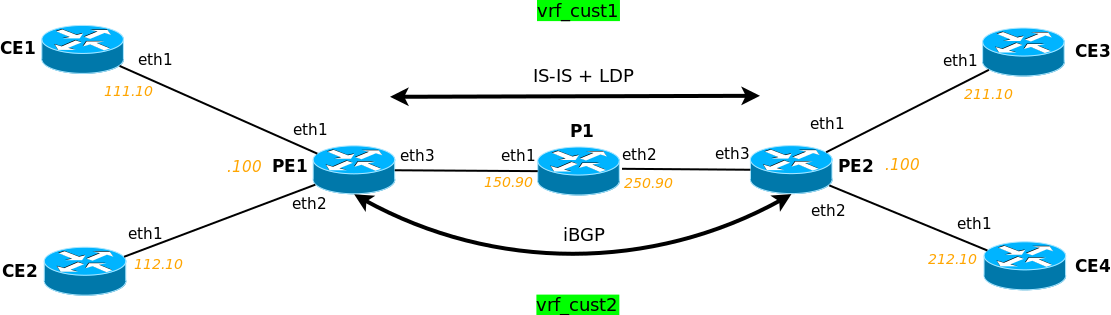
Vagrantfile will be slightly altered too:
Vagrant.configure("2") do |config|
  config.vm.define "p1" do |p1|
      p1.vm.box = "debian/stretch64"
      p1.vm.hostname = "P1"
      p1.vm.network "private_network", ip: "192.168.150.90", virtualbox_intnet: "pe1p1"
      p1.vm.network "private_network", ip: "192.168.250.90", virtualbox_intnet: "pe2p1"
      p1.vm.provision "file", source: "gen_frr_config.py", destination: "gen_frr_config.py"
      p1.vm.provision "shell", path: "l3vpn_provisioning"
  end
  config.vm.define "pe1" do |pe1|
      pe1.vm.box = "debian/stretch64"
      pe1.vm.hostname = "PE1"
      pe1.vm.network "private_network", ip: "192.168.111.100", virtualbox_intnet: "pe1ce1"
      pe1.vm.network "private_network", ip: "192.168.112.100", virtualbox_intnet: "pe1ce2"
      pe1.vm.network "private_network", ip: "192.168.150.100", virtualbox_intnet: "pe1p1"
      pe1.vm.provision "file", source: "gen_frr_config.py", destination: "gen_frr_config.py"
      pe1.vm.provision "shell", path: "l3vpn_provisioning"
  end
  config.vm.define "pe2" do |pe2|
      pe2.vm.box = "debian/stretch64"
      pe2.vm.hostname = "PE2"
      pe2.vm.network "private_network", ip: "192.168.211.100", virtualbox_intnet: "pe2ce3"
      pe2.vm.network "private_network", ip: "192.168.212.100", virtualbox_intnet: "pe2ce4"
      pe2.vm.network "private_network", ip: "192.168.250.100", virtualbox_intnet: "pe2p1"
      pe2.vm.provision "file", source: "gen_frr_config.py", destination: "gen_frr_config.py"
      pe2.vm.provision "shell", path: "l3vpn_provisioning"
  end
  config.vm.define "ce1" do |ce1|
      ce1.vm.box = "debian/stretch64"
      ce1.vm.hostname = "CE1"
      ce1.vm.network "private_network", ip: "192.168.111.10", virtualbox_intnet: "pe1ce1"
      ce1.vm.provision "shell", path: "l3vpn_provisioning"
  end
  config.vm.define "ce2" do |ce2|
      ce2.vm.box = "debian/stretch64"
      ce2.vm.hostname = "CE2"
      ce2.vm.network "private_network", ip: "192.168.112.10", virtualbox_intnet: "pe1ce2"
      ce2.vm.provision "shell", path: "l3vpn_provisioning"
  end
  config.vm.define "ce3" do |ce3|
      ce3.vm.box = "debian/stretch64"
      ce3.vm.hostname = "CE3"
      ce3.vm.network "private_network", ip: "192.168.211.10", virtualbox_intnet: "pe2ce3"
      ce3.vm.provision "shell", path: "l3vpn_provisioning"
  end
  config.vm.define "ce4" do |ce4|
      ce4.vm.box = "debian/stretch64"
      ce4.vm.hostname = "CE4"
      ce4.vm.network "private_network", ip: "192.168.212.10", virtualbox_intnet: "pe2ce4"
      ce4.vm.provision "shell", path: "l3vpn_provisioning"
  end
end
What’s changed here? Apart from P1 router added between PE1 and PE2 you can see two provision methods for non-CE routers. file provision will copy gen_frr_config.py Python script to a router. And then run our shell provision script. Here it is:
#!/usr/bin/env bash

X=$(hostname)
case "$X" in
    PE*)
        mpls_ints=("eth3")
        loopback_addr="${X: -1}"
        router_type="pe"
        ;;
    P*)
        mpls_ints=("eth1" "eth2")
        loopback_addr=5
        router_type="p"
        ;;
    CE*)
        loopback_addr="$(("${X: -1}"10))"
        router_type="ce"
        ;;
    *)
        echo 'Invalid hostname'
        exit 1
        ;;
esac
sudo ip addr add 172.20.5."$loopback_addr"/32 dev lo
sudo apt install -y tcpdump vim
if [[ !("$router_type" =~ "ce") ]]; then
    sudo sysctl net.ipv4.ip_forward=1
    sudo sysctl net.ipv6.conf.all.disable_ipv6=0
    sudo sysctl net.ipv6.conf.all.forwarding=1
    sudo modprobe mpls_router
    sudo modprobe mpls_iptunnel
    sudo sysctl net.mpls.platform_labels=100000
    for interface in "${mpls_ints[@]}"; do
        sudo sysctl net.mpls.conf."$interface".input=1
    done
    wget https://github.com/FRRouting/frr/releases/download/frr-6.0/frr_6.0-1.debian9+1_amd64.deb
    wget https://github.com/FRRouting/frr/releases/download/frr-6.0/frr-dbg_6.0-1.debian9+1_amd64.deb
    wget https://github.com/FRRouting/frr/releases/download/frr-6.0/frr-pythontools_6.0-1.debian9+1_all.deb
    sudo apt install -y libc-ares2 libjson-c3 python-ipaddr python3-jinja2
    sudo dpkg -i frr_6.0-1.debian9+1_amd64.deb
    sudo dpkg -i frr-dbg_6.0-1.debian9+1_amd64.deb
    sudo dpkg -i frr-pythontools_6.0-1.debian9+1_all.deb
    echo -e 'zebra=yes\nbgpd=yes\nisisd=yes\nldpd=yes' > frr-daemons
    sudo mv frr-daemons /etc/frr/daemons
    python3 gen_frr_config.py
    sudo mv frr_generated_config /etc/frr/frr.conf
    sudo chown frr:frr /etc/frr/daemons
    sudo chown frr:frr /etc/frr/frr.conf
    sudo systemctl start frr.service
else
    ce_address=$(ip -br -4 address show eth1)
    IFS=' ' read -ra addr <<< "$ce_address"
    IFS='.' read -ra octets <<< "${addr[-1]}"
    subnet=${octets[2]}
    sudo ip route add 192.168.0.0/16 via 192.168."$subnet".100
fi
if [[ "$router_type" =~ "pe" ]]; then
    sudo ip route add blackhole 0.0.0.0/0 table 10
    sudo ip route add blackhole 0.0.0.0/0 table 20
    sudo ip link add name vrf_cust1 type vrf table 10
    sudo ip link add name vrf_cust2 type vrf table 20
    sudo ip link set eth1 master vrf_cust1
    sudo ip link set eth2 master vrf_cust2
    sudo ip link set vrf_cust1 up
    sudo ip link set vrf_cust2 up
fi
Things are going just slightly different here, but at the end we got same result. Notable differences here will be:
* IPv6 support and IPv6 routing enabled on PE/P – just for fun
* bgpd enabled in FRR daemons – we need BGP to propagate VPN routes
* we use Python 3 (and that’s why we install python3-jinja2) to generate frr.conf
* we didn’t install any routes in VRF manually on PE (apart from default blackhole)
* we install 192.168.0.0/16 route on CE
And here are gen_frr_config.py script:
import subprocess
import ipaddress
from jinja2 import Template
# Python 3.5 script
# subprocess module from stdlib improved in later versions

frr_config_template = '''frr version {{ frr_version }}
frr defaults traditional
hostname {{ router_hostname }}
service integrated-vtysh-config
username cumulus nopassword
!
{% for interface in mpls_interfaces %}
interface {{ interface }}
 ip router isis ISIS
 isis circuit-type level-2-only
 isis network point-to-point
!
{% endfor %}
interface lo
 ip router isis ISIS
 isis passive
!
{% if edge_router %}
router bgp 65010
 neighbor {{ neighbor_loopback }} remote-as 65010
 neighbor {{ neighbor_loopback }} update-source {{ local_loopback }}
 !
 address-family ipv4 vpn
  neighbor {{ neighbor_loopback }} activate
 exit-address-family
!
router bgp 65010 vrf vrf_cust1
 !
 address-family ipv4 unicast
  redistribute connected
  label vpn export auto
  rd vpn export 65010:10
  rt vpn both 1:1
  export vpn
  import vpn
 exit-address-family
!
router bgp 65010 vrf vrf_cust2
 !
 address-family ipv4 unicast
  redistribute connected
  label vpn export auto
  rd vpn export 65010:20
  rt vpn both 2:2
  export vpn
  import vpn
 exit-address-family
!
{% endif %}
mpls ldp
 router-id {{ local_loopback }}
 !
 address-family ipv4
  discovery transport-address {{ local_loopback }}
  !
  {% for interface in mpls_interfaces %}
  interface {{ interface }}
  !
  {% endfor %}
 exit-address-family
 !
!
router isis ISIS
 net {{ iso_net }}
 metric-style wide
!
line vty
!'''
mpls_int_map = {
    'P1': ['eth1', 'eth2'],
    'PE1': ['eth3'],
    'PE2': ['eth3']
    }
def prepend_octet(octet):
    if len(octet) == 0 or len(octet) > 3:
        raise ValueError('incorrect octet {}'.format(octet))
    elif len(octet) == 3:
        return octet
    else:
        while len(octet) < 3:
            octet = '0' + octet
        return octet
frr_ver_run = subprocess.run(['/usr/lib/frr/zebra', '--version'],
                             stdout=subprocess.PIPE)
frr_ver = frr_ver_run.stdout.decode('utf-8')
frr_ver_start = frr_ver.index('version')
frr_ver_end = frr_ver.index('\n', frr_ver_start)
frr_version = frr_ver[frr_ver_start+8:frr_ver_end].strip()
with open('/etc/hostname', 'r', encoding='utf-8') as infile:
    router_hostname = infile.read().strip()
mpls_interfaces = mpls_int_map[router_hostname]
edge_router = True if 'E' in router_hostname else False
loopback_addr_run = subprocess.run(['ip', '-br', 'address', 'show', 'lo'],
                                   stdout=subprocess.PIPE)
loopback_addr_list = loopback_addr_run.stdout.decode(
    'utf-8').strip().split(' ')
for address in loopback_addr_list:
    if '/' not in address:
        continue
    try:
        slash = address.index('/')
        local_loopback = ipaddress.ip_address(address[:slash])
    except ValueError:
        continue
    if not local_loopback.is_loopback:
        break
lo_octets = local_loopback.compressed.split('.')
neighbor_loopback = ipaddress.ip_address('127.0.0.27')
if edge_router:
    if lo_octets[-1] == '1':
        neighbor_last_octet = '2'
    elif lo_octets[-1] == '2':
        neighbor_last_octet = '1'
    else:
        raise ValueError('unacceptable loopback address {}'.format(
            local_loopback.compressed))
    neighbor_octets = lo_octets[:-1]
    neighbor_octets.append(neighbor_last_octet)
    neighbor_loopback = ipaddress.ip_address('.'.join(neighbor_octets))
iso_net = [prepend_octet(x) for x in local_loopback.compressed.split('.')]
iso_net = ''.join(iso_net)
step = 0
for i in range(4, len(iso_net), 4):
    iso_net = iso_net[:i+step] + '.' + iso_net[i+step:]
    step += 1
iso_net = '49.0001.' + iso_net + '.00'
template = Template(frr_config_template)
rendered = template.render(frr_version=frr_version,
                           router_hostname=router_hostname,
                           mpls_interfaces=mpls_interfaces,
                           edge_router=edge_router,
                           local_loopback=local_loopback.compressed,
                           neighbor_loopback=neighbor_loopback.compressed,
                           iso_net=iso_net
                           )
with open('frr_generated_config', 'w', encoding='utf-8') as config_file:
    for line in rendered.split('\n'):
        if line.strip():
            config_file.write(line+'\n')
That script issue couple of system commands to gather required info and then with Jinja2 templating engine it construct config file and write it out to file. That way we don’t need to do anything manually. Nothing really complex is going on in that script, so if you know a little Python you can easily read it. FRR configuration template is hardcoded inside file for easier transfer to a box. Difference here is a BGP configuration on PE routers. Here we configure 3 BGP “sessions”, one for GRT (global routing table) and one for every VRF. VRF sessions will not build up any neighborship, they exist only to redistribute connected routes from within VRF and assign RT and RD values. Also, take note of “label auto” and “import/export vpn”, first thing will allocate service label and second will allow route exchange with GRT BGP. GRT session will build neighborship but only exchange prefixes for VPNv4 address family. Last thing we need to do – spin up our topology. By logging to CEs, you can verify ping working only inside VRF (notice that I use another address schema there). And on PEs you can find that outputs interesting:
PE1# show bgp summary

IPv4 Unicast Summary:
BGP router identifier 172.20.5.1, local AS number 65010 vrf-id 0
BGP table version 0
RIB entries 0, using 0 bytes of memory
Peers 1, using 21 KiB of memory
Neighbor        V         AS MsgRcvd MsgSent   TblVer  InQ OutQ  Up/Down State/PfxRcd
172.20.5.2      4      65010      12      12        0    0    0 00:06:46            0
Total number of neighbors 1
IPv4 VPN Summary:
BGP router identifier 172.20.5.1, local AS number 65010 vrf-id 0
BGP table version 0
RIB entries 3, using 480 bytes of memory
Peers 1, using 21 KiB of memory
Neighbor        V         AS MsgRcvd MsgSent   TblVer  InQ OutQ  Up/Down State/PfxRcd
172.20.5.2      4      65010      12      12        0    0    0 00:06:46            2
Total number of neighbors 1
PE1# show bgp ipv4 vpn all
BGP table version is 2, local router ID is 172.20.5.1, vrf id 0
Status codes:  s suppressed, d damped, h history, * valid, > best, = multipath,
               i internal, r RIB-failure, S Stale, R Removed
Nexthop codes: @NNN nexthop's vrf id, < announce-nh-self
Origin codes:  i - IGP, e - EGP, ? - incomplete
Network          Next Hop            Metric LocPrf Weight Path
Route Distinguisher: 65010:10
*> 192.168.111.0/24 0.0.0.0@6<         0         32768 ?    UN=0.0.0.0 EC{1:1} label=80 type=bgp, subtype=5*>i192.168.211.0/24 172.20.5.2         0    100      0 ?
    UN=172.20.5.2 EC{1:1} label=80 type=bgp, subtype=0
Route Distinguisher: 65010:20
*> 192.168.112.0/24 0.0.0.0@7<         0         32768 ?    UN=0.0.0.0 EC{2:2} label=81 type=bgp, subtype=5*>i192.168.212.0/24 172.20.5.2         0    100      0 ?
    UN=172.20.5.2 EC{2:2} label=81 type=bgp, subtype=0
Displayed  4 routes and 4 total paths
PE1#
Doing tcpdump on P1 router you can see double tagged packets going here and there. L3VPN works – we met our target! By the way you may see another view on L3VPN with configs in a similar lab here [11].
Caveats
Working on this labs I stumble upon very strange and annoying thing. In a VRF lab I found CE send packets to PE, but none of them can be seen on the other end. Weirdest thing that pinging PE interface works, but still no packets visible on PE! I spent many time on it, blaming Vagrant and Virtualbox, trying to switch to libvirt (stuck at another issue). What I found is addresses assigned in Vagrantfile get configured not only on boxes themself, but also on vboxnetX interfaces on host machine! They answered my pings, but of course can’t route traffic. I don’t know what cause it, and never stumble upon such a thing before. So, when in doubt do that:
* flush all addresses out vboxnet interfaces on host machine with ip address flush INTERFACE
* flush neighbors out of interfaces on boxes with ip neighbor flush dev INTERFACE
* in some cases you must even restart (!) FRR service on routers
Hope you will not face that issue or at least this advices will help.
Next one is iproute2 documentation. For such a big and great project it’s very scarce and outdated – take a look [12]. Just don’t confuse it with “man”, it is great. So while digging into matters I found that links [13] [14] useful.
Lastly, you may notice my comment in Python script. Debian isn’t using recent software, staying “stable”, so it’s bundled with Python version 3.5 (3.7 is recent one, as of this writing). In 3.7 subprocess lib get some improvements.
Conclusion
As we saw – all required parts for MPLS L3VPN service works on Linux. What it gives? First of all of course – L3VPN implementations in different whitebox NOS. Maybe they already present in a market and I just unaware of them, by the way. VRF and EVPN for example already available on Cumulus Linux. Another possible outcome is MPLS on hosts and hypervisors, which allow centralized MPLS path programming down beyond ToR level in DC. And hey, with all that DPDK, Snab and FD.io dataplane Linux tools, maybe someone build real LSR out of Linux server, who knows. VPN route reflectors are another possible thing.
Links
[1] MPLS fundamentals book
[2] MPLS in SDN era book
[3] Kernel modules
[4] Linux 4.1 changelog
[5] Linux 4.3 changelog
[6] FRR
[7] FRR documentation
[8] Cumulus: VRF for Linux
[9] Linux 4.8 changelog
[10] Post GitHub repository
[11] frr-bgp-l3vpn by rwestphal on GitHub
[12] iproute2 documentation
[13] stackoverflow, MPLS on Linux configuration
[14] MPLS testbed on Ubuntu by Sam Russell
4 thoughts on “L3VPN on Linux”
Comments are closed.